
If you have an existing Apple Mac and want to add it to your JumpCloud configuration there are a few things to note before you Jump in!
 Adding a system to JumpCloud is very simple.
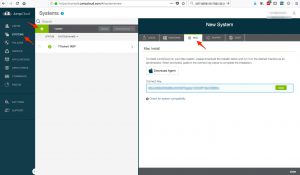
Step 1 – Add the System – Go to Systems, click the plus sign. Select the MAC Tab, Copy the Connect Key, download the agent .PKG file and run it. Paste the Connect key when prompted.
Note: In a later blog post I will document how to create your custom .PKG file so that you can automate the deployment of the JumpCloud Agent with JAMF Now.
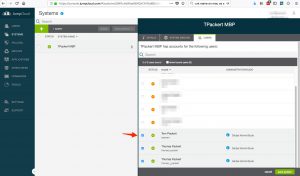 Step 2 – Assign users to the system – Click on the new system that you created and then Click on the Users tab then tick on each user that you want to have an account on the Mac. Within 60 seconds the users will be created on the Mac
Step 3 – You are done!
 When adding JumpCloud agent to an existing Mac, if the JumpCloud Account name matches the Apple Mac Account name the user ids will immediately sync. If you were a local admin on the Mac and are not configured as an Admin for the system on JumpCloud then you will lose admin rights.
If you are following a standard user naming convention in JumpCloud and the existing Mac’s Account name does not match that convention you have a few choices then a new account will be created and the existing Mac account will not be synced with JumpCloud.
The simplest method to force the syncing is to create the user in JumpCloud with the same user name as the Mac Account Name. Although this will mean not having a standard user naming convention in JumpCloud it is safe.
To view local Mac Account Name Click on System Preferences, then Users & Groups, Unlock the Panel and enter the admin password. Then, hold down CTRL and click the user name you want to lookup. Click on Advanced Options to view the local Mac Account Name. This is the value you should use as the User Name in JumpCloud Users
Create a new user on the Mac and leave the existing local mac user unmanaged. This means starting to use a new login id and migrating files from the old user to the new user.
Another, more dangerous option is to research how to rename a Mac Account name. This is beyond the scope of this article and you should make sure of two things
1 – There is a second Admin user on the system and you know the password
2 – You have a good backup. The Mac Keychain does not like being migrated and the FileVault II has some dependencies that lots of users have run into online.
Warning! – Do not change the Mac Account Name in Advanced options, although you can, it will mess up your ability to login and you will be Googling for how to recover Admin rights and booting into Single User Mode (COMMAND S).
 The User names in JumpCloud and Mac support dots and underscores. So you can add several variations of a name.
When I add users to a system in JumpCloud I also add a generic System Admin user that is a Global System Admin so that no matter what happens every Mac will have a System Admin account active.
Excellent post! I found the rename on Mac to be pretty easy if you follow this helpful Youtube video for “Renaming an Existing User Account on macOS® | JumpCloud Tutorial”
https://www.youtube.com/watch?v=1j00Bl0NpFE&t=2s
Thanks for the tip! I tried those instructions and it worked for me too. No issues with File Vault II, Key Chain or Time Machine.
https://support.jumpcloud.com/customer/portal/articles/2390725#change
I did get an error and had to reboot manually “execution error: An error of type -10827 has occurred. (-10827)”. Can not find any documentation on that error.
I would still recommend having a good backup before attempting to rename an account