If you have Jumpcloud installed as your Directory as a Service, patching Zoom’s latest ZeroDay Vulnerability is pretty straighforward for office and remote workers.
Jumpcloud has a feature called “Commands”. For Windows machines, the commands can be CMD or Powershell. LInux and Mac commands are also supports but those commands are bash scripts. In order to patch all the Windows machines.
I wrote a short Powershell script based on the advice in the Bleeping Computer article. The deployed the script to all of the computers with Jumpcloud and was done. This method can be used to add Registry Values to any group of Windows systems whether they are on premise and in a domain or remote.
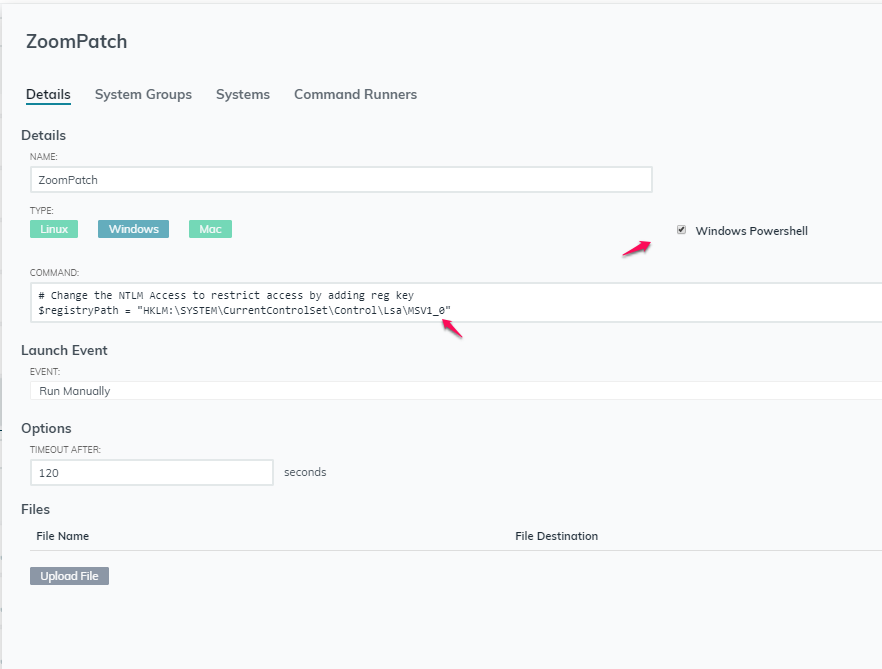
1 – Login to JumpCloud Admin portal 2 – Click on Commands on the Left portal 3 – Click on + icon to add a command 4 – Give the Command a Name “ZoomPatch” 5 – Click on PowerShell 6 – Paste the code below into the command field 7 – Select Command Runners and select the Admin account to run command 8 – Select Systems and then select all systems to apply this patch to 9 – Click Save 10 – The select the ZoomPatch Command and Click the Run Now button 11 – Check the results in the results space at the bottom of the commands page
Change the NTLM Access to restrict access by adding reg key
Using cron/crontab on a Linux server has always been a good way to control the scheduling of repeating background tasks. Especially in the days before cloud, containers and virtual machines. There are plenty of websites offer advice on “Crontab Best Practices” and many forum posts that start with “I have inherited a sprawling crontab“. In a complex application crontab suffers “organic complexity” where the crontab entries become confusing to the new sysadmins one crontab entry at a time.
There are lots of posts about how to get a listing of all your cron jobs for all users that run on a machine. It is very easy to accidentally schedule resource intensive tasks at the same time and kill performance. Manually moving cron jobs to different servers can also create conflicting or duplicate tasks. Cron tasks running on multiple servers also can make debugging difficult. Debugging cron tasks usually means tailing/greping text logs. There is also no easy way to know that a task that used to take 1 minute is now taking 10 minutes.
The crontab scheduling syntax is elegant but does leave lots of room for errors by new sysadmins, or even experienced. Personally I like to add a comment for each line with the syntax of when the task is to run is spelled out in English and a description of what the task does. There are lots of cron tab generators and decoders online. For example https://crontab-generator.org/ and https://freeformatter.com. Just paste a mysterious cron entry into the decoder to get an explanation. When remediating sprawling crontabs it is not unusual to find tasks that should run once a month running everyday unintentionally.
Another annoyance of using cronjobs is being able to manage shutting down the tasks because of maintenance requirements. If the devops team is in the middle of performing an upgrade, we would want to ensure that cron tasks are not also running at the same time and which ones need to run after the maintenance event.
Fortunately, there is a terrific tool to solve all these problems with cron. The solution is Rundeck (https://www.rundeck.com/) . Rundeck can be deployed as a free open source version or it can be deployed as a paid enterprise version with support.
Rundeck provides a web based portal where less technical users can manage the scheduling of tasks. The web portal allows users to ‘self service’ tasks. The users can create jobs, run jobs, edit jobs and view the output of the jobs logs. This is terrific for audit purposes.
RunDeck allows the user to define worker nodes. In the age of cloud, this means that you can spin up multiple worker nodes (ec2 instances) to run specific task with unique resource size attributes. The nodes can be destroyed after the task is completed. This makes it easy to avoid idle cloud images that cost money while ensuring that the instances have the resources that match the task to run on them.
The old crontab issue of not being aware that a task did not run for some reason and manually having to figure out why also goes away. Notifications to users are easy to setup so that if a job fails all the relevant users will know immedicately. This is especially user for things like Salesforce integrations where your Talend task dies because of too many rows returned and Salesforce killed your extract.
The jobs can also be defined to pull the scripts for the task from a git repository. This ensures that there is only one source managed copy of each cron task and that everytime it runs it will pull the current version of the script.
With crontab the tasks are listed out under the user’s crontab. Most of the time in the past, the user running the task likely had more access than the task needed. Rundeck supports LDAP authentication as well as LDAP syncronization. I will save integrating JumpCloud with Rundeck for another blog post.
Rundeck also elegantly solve the problems of storing secrets and passwords for integrations in their Key Storage Facility. I will need to explore the potential to integrate Jumpcloud’s SSH key storage with Rundeck’s Key Storage Facility.
There are plenty of resources online on Youtube. Rundeck has many resources online here. The Rundeck community provides plenty of support. I will not repeat instruction on installing or using here.
Your devops team will be happy when all of the crontab tasks are migrated to Rundeck jobs. Visibility to running tasks, notifications and self service will make your technical users happier and productive.
Most Apple Mac based businesses I have seen tend not to centrally manage their Macs like companies have been doing with Microsoft Windows PCs, Active Directory, Group Policies and Powershell. Today, when companies need to pass security audits, the lack of comprehensive Mac Management can result in a significant amount of IT remediation effort.
This article will describe how to:
Procure Apple products with the Apple E-Commerce website.
Deploy Apps and Configure the devices with Apple Business Manager (ABM).
How to use JAMF Now for mobile device management (MDM)
How to use JumpCloud Directory as a Service (DaaS) to handle the ongoing management, auditing and security of the devices.
JAMF Now is a cloud based MDM tool from the people who also built the JAMF Pro (formerly Casper Suite). JAMF Pro is an enterprise solution that is much more expensive and complicated to implement than Jamf Now.
The Apple eCommerce site is found at https://ecommerce.apple.com. This site is a private version of the Apple store. Templates for system configuration can be created to make reordering easier. The website provides features to compose orders as proposals, send the proposals to authorized purchasers and place the orders for delivery to the end user. The e-Commerce website allows IT to configure/purchase new Macs online without phone calls or visits to the Apple store or the consumer Apple Online store
The eCommerce website is a little bit clunky but it works well enough to order products. The session timeouts are aggressive and also logins require two factor authentication. Another awkward UX quirk occurs when composing a proposal to be ordered. It is not possible to fill in the shipping address on the proposal so that purchasing only needs to approve. On this site you will create Apple IDs for users who are authorized as either purchasers or composers.
In 2018. Apple merged the Device Enrollment program (DEP) and Volume Purchasing Program (VPP) into a new product called Apple Business Manager (ABM). The software licenses from the Apple App Store can be managed with the Volume Purchasing features of ABM. The benefit to the VPP system is that software licenses can be managed centrally from the VPP portal so that licenses are not lost when equipment lost or stolen or given away without reformatting.
Note: Many online tutorials still refer to the old DEP and VPP tools, do not confuse these with the newer ABM tool that replaces DEP and VPP.
After a new Mac is ordered online, purchased and delivered using the E-Commerce site, the Mac will automatically be part of the ABM System and will be managed by the ABM Configuration tools. When a Mac is part of the ABM system, it ‘belongs’ to the enterprise and many more security management settings are available as compared to a consumer Mac. Many remote users can have their Mac drop shipped directly to them. No need to bring the Mac into IT dept to configure and ship. Shipping can add an extra $100 to $150 to the order as well as delays.
Note: One option on shipping is to give the user the option to pick up the Mac at a nearby Fedex location instead of shipping to their home that may result in the delivery being stolen if the user is not home.
To apply security controls we will use the JAMF Now tools and JumpCloud to deploy apps, manage security settings and manage users. We also like to use the Sophos End Point Protection on all computers, this protects the Mac’s even when they are roaming on networks outside of the corporate firewall
Getting Started – The first step is to enroll in the E-Commerce and ABM systems. You will need your DUNS number from Dunn and Bradstreet. And you should copy and paste the information from the D&B Lookup Website. Apple uses this information to verify the company. If there are fields that mismatch then the approval process takes longer. It is also helpful to work with a Business sales rep from your local Apple store to assist in getting the approvals complete, they can intervene on your behalf to clear up any verification issues.
Note: Each Apple store has a Business Department, they can help your company get setup in the E-Commerce and AMB tools
When approved Apple will send you an email with your Apple Customer Number that looks like the picture above.
The Apple Business Manager (ABM) is a completely different website from the eCommerce site with a separate login. The ABM website will allow you to push apps from the App Store to specific devices.
The ABM website also allows you to define “Managed Apple IDs” so that purchases are completed with a company managed Apple ID and not a personal Apple id. These managed apple ids have a format of tom.packert@appleid.mydomain.com. This way these managed apple ids will not conflict with actual email addresses.
After creating the ABM account, there are several steps to complete.
define busines locations.
define accounts/users/roles
Add the Jamf Now MDM server to the account
Add Software licenses to the account
Add Devices to the Account
When you create users you will specify mobile phone numbers for them to be able to use two factor authentication. As you purchase Macs on the ecommerce site, the devices will appear in the list of devices, ready for you to assign to users.
The next step is to link the ABM Site to the JAMF Now MDM servers. This is a process of generating keys on the sites and uploading the keys so that trust is established. Once the MDM link is setup, new devices will be automatically managed by the JAMF Now MDM servers. The MDM trust setup needs to be renewed annually. The devices managed by ABM have more controls than a non managed devices. Security features like remote wiping, lost/stolen tracking are available through JAMF
Sign up for JAMF Now – You can get started with a free JAMF Now account. It is free for up to three devices. The $2/month beyond that. There is a new Plus version for $4/month that allows you to push repackaged app that are not available on the Apple App store. Here is the link to signup for Jamf Now https://signup.jamfcloud.com
JAMF Now manages security through an extensive list of options that are collected into groups call Blueprints. It will take a lot of careful planning to implement blueprints so that people can still work despite restrictions. If users have been a local admin on a Mac it could be quite frustrating as security restrictions can remove features that have been part of your daily work. There are also advanced features that allow users to act as local non-enterprise users for some applications and the data is segregated.
Setup ABM Connection – After you sign up for Jamf Now the next step is to link your Jamf Now account with the ABM system. Click on Volume Purchase then follow the instructions that are quite clear. This process is exchanging keys between the Apple Business Manager and Jamf Now to establish trust.
Setup the Apple Push Notifications (APN) – The next step in the setup is enabling Apple to push notifications to JAMF now. Again, this is a clearly documented step that establishes trust between Apple Application Integration and Jamf Now.
Setup the Auto-Enrollment Connection – The next step is to establish the trust relationship between Apple ABM and Jamf Now with the Auto Enrollment configuration.
Create a Default Blueprint The Blueprints section contains a lot of options to allow management of many values and security features. If you have a corporate WiFi you can push the WiFi settings to each device automatically. You can enable File Vault II full disk encryption and JAMF Now will store the recovery key for the Full Disk Encryption. You can also do things like disable the ability to take screen shots for HIPAA compliance. So much device control is possible here. After you get comfortable with the options then you can create additional Blueprints to fine tune security settings for different types of users. The Apps section of Blueprints allows you to specify what apps from the Apple App store should be installed. Skitch and Amphetamine are shown here are apps to be automatically installed on any computer
However, there will have some feature overlaps between Jamf Now and JumpCloud. JumpCloud allows an admin to also manage WiFi SSIDs and passwords in a more elegant way by implementing Radius as a Service. If the WiFi Access points suppport radius servers, then JumpCloud’s RaaS is a more elegant solution than pushing SSIDs and passwords with JAMF Now. JumpCloud also supports man aging FileVault II and stores the encryption keys.
Setting Up JumpCloud Directory as a Service
Jumpcloud DaaS provides many features that support effective security policies without the complexity of an Active Directory Server or other LDAP server. Jumpcloud runs in the cloud and it provides the ability to manage users in Google G-Suite and MS Office 365 as well as the ability to sync with Active Directory. Creating a user in JumpCloud will push that user into these other directory systems automatically. There is a convenient Mac utility that allows the user to change the password on the local Mac user and the JumpCloud account at the same time.
JumpCloud provides SAML SSO authentication to manage access to other SaaS systems. JumpCloud also provides management and policy capabilities for Windows, Mac and Linux systems. System management provide group policy like abilities to remotely make changes to all three operating systems.
One of my favorite features is the SSH key management. Upload a user’s public SSH key to the JumpCloud user record and it will be automatically pushed to all systems that are assigned to the user. For managing SSH keys on AWS EC2 or other Linux server instances this feature is especially helpful.
JumpCloud is free for up to ten users. After that the Pro version is $12/user/month billed monthly or $9/user/month billed annually. Here is a link to the pricing page.
The JumpCloud DaaS works well with local SANs like QNAP and Synology for authentication. These low cost SANs can be configured as local file servers and as Time Machine backups for mission critical workstations/applications.
Configuring the JumpCloud SAML/SSO to authenticate users on all your other SaaS applications simplifies application logins for users. Users have a simple application portal via jumpcloud so that logging into other SaaS application is a simple click on the application icon. JumpCloud supports SAML/SSO for many SaaS apps. I have configured for Atlassian, AWS, G-Suite, Invision, Jamf Now, New Relic, Slack, SumoLogic and WordPress (mini Orange plugin). Managing users is greatly simplified, access to an app for a user if just a click on a check box. Adding Multi Factor Authentication is also a single check box for all the SAML/SSO. Removing access to an application is also a single check box. The only downside to SAML/SSO provisioning is that many SaaS vendors require the more expensive ‘enterprise’ version of their product. Hopefully, in light of security concerns vendors will move away from this requirement.
There are three types of SAML/SSO authentication
Synced Users – eg G-Suite, users managed in JumpCloud sync to G-Suite automatically via G-Suite API
Manual Provisioning – eg Atlassian. The Admin needs to login to Atlassian to create the user and assign roles initially. Ongoing authentication is handled by SAML/SSO
Just In Time Provisioning – eg AWS, no need to manually provision users in AWS, they are provisioned as needed with their own named user and roles
With these four tools, a small to midsize business can implement an elegant system to procure, deploy, manage and patch Apple devices, manage users, groups, sync with Office 365 and G-Suite, SSH keys and manage WiFi access. The cost is minimal and many hours of IT support are eliminated by having standardized, managed equipment in the hands of your users to maximize their productivity.
Phishing attacks are extremely sophisticated today. One of the problems facing small businesses is the lack of robust IT security and support systems and the cleverness of the attackers. Employees at small companies need to be exceptionally aware of targeted phishing attacks which could lead to significant financial losses. This article will describe a simple five minute step that will mitigate one form of these clever spear phishing attacks.
One form of the phishing attack I have seen three times in recent years uses a slightly misspelled variation of the domain name. I have seen very convincing emails appearing to be from a CFO to a controller, including email trails from the CEO to wire money quickly to some account. The emails included instructions that the paperwork will follow. The perpetrators even follow up insistently via email continuing to impersonate the CFO as to whether the wire has been sent. It takes quite an astute recipient to look for subtle clues that the email is not real. The human tendency is to please an insistent boss and to follow the instructions to wire the money quickly. Imagine how an employee might feel, after wiring a potentially devastating amount money to an account because of being duped by a cleverly crafted email.
One occurrence of this scam was enabled by the popular VistaPrint.com website. The perpetrator registered a domain name similar to ours with only two letters transposed. The names of the officers were real and the email trail back and forth looked genuine. Clearly, there was a lot of time put into this effort to defraud us. VistaPrint.com does not require a credit card for a free 30 day trial so there was no risk of being caught. Today, I was still able to sign up for the same typo domain name on VistaPrint without a credit card.
Fortunately, our controller was pretty sharp and the email raised her suspicions, a good trait for a controller. Using the “Show Original” option on google mail I was able to determine how the email was delivered. The originating domain was legitimate with DKIM and SPF validations passing. The only clue was the inspection of the domain name and the IP address was not ours which lead me to a closer inspection of the domain name. It was right there in plain sight, two letters transposed.
I thought a lot on how to prevent this from occurring in the future. It is common practice to post your company leadership on your website. Also, companies make their internal management structure visible on LinkedIn. It was probably these public sources of information that gave the fraudsters the names of the people to include on the emails. I thought about posting ‘honey pot’ officers on the website and LInkedin and set filters when these users receive emails. But I nixed that because it would cause too much confusion to our legitimate customers and partners.
Next, I thought about why would we be targeted? It turns out this is pretty easy answer. If you issue press releases, as a startup, about receiving substantial investments, you will become a prime target. Not only because you have money in the bank, but startups tend to have less formal procedures and are more chaotic. Startups also tend not to have fulltime IT security staff that can react quickly to threats. The fraudsters invest in these schemes because it pays and there is little chance of being caught. When I contacted VistaPrint.com’s legal department, they let me know that their own executive team had been duped into wiring money. Fortunately, they were able to recall the wire transfer, but it was a close call.
So what other ways have I thought about on how to prevent this. One idea was to add a word or picture of the day to the email signatures. This could easily be done with the BetterCloud signature tools that schedule signature updates for Gmail signatures. There are two problems with this. One, the users would still need to be vigilant, less so than catching two transposed letters but still vigilant. The other is that Gmail signatures only work on the web client and not mobile devices. Any email sent from a mobile device will be missing the word or picture of the day.
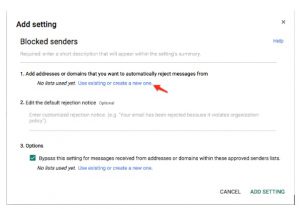
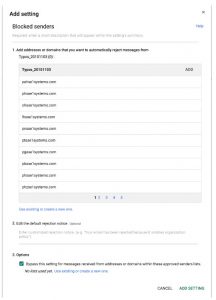
My final solution which I believe should be a new best practice is to add a list misspellings of the company’s domain name to the Gmail blocked senders list. The blocked senders list is a feature of the paid Google Apps for Work. It is not available to the free legacy Google Apps accounts. I used the SEOTools Typo generator tool (link here) to create a list of typos to add to the blocked senders list. I entered my company name and was given a list of likely names. You can manually add other names where 1s are swapped with l’s and O’s with 0’s, B’s and 8’s etc. Updating your company’s blocked senders list is a simple five minute task that could potentially save your company a lot of pain and financial loss in the future.
Here is a link to a document on how to add blocked senders to your Google Apps account. The instructions are likely to change so it is better to refer to Google’s documentation for this process. You will need to be an admin on the Google Apps domain. Click on the gear and select “Admin this Domain”. Select APPS >> Google APPS >> Settings for GMAIL >> Advanced Settings. Scroll down to the SPAM section and select ADD ANOTHER. Then select “Use Existing or Create a new one”, then Create, give the list a name like typos_20151103 and paste the generated typo list into the box. The UI is not quite intuitive, as with many things Google Admin related, but it works. You can also edit a rejection message to the blocked senders list.
The only caveat to this technique is that if you have want to receive email from a legitimate company that is only one letter away from your domain name you will need to update the blocked senders list. Most of the time this will be very unlikely.
Here is a link to a useful white paper about many more types of bank fraud schemes. The key take away, is to understand that busy entrepreneurs who issue press releases about investment funding will attract scammers and your finance staff should to trained to look for these types of attempts to steal your money.
Note: This blocked senders feature is also very useful to block emails from competitors that may have hired your staff or you are hiring their staff.
If you have an existing Apple Mac and want to add it to your JumpCloud configuration there are a few things to note before you Jump in!
Adding a system to JumpCloud is very simple.
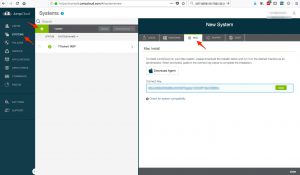
Step 1 – Add the System – Go to Systems, click the plus sign. Select the MAC Tab, Copy the Connect Key, download the agent .PKG file and run it. Paste the Connect key when prompted.
Note: In a later blog post I will document how to create your custom .PKG file so that you can automate the deployment of the JumpCloud Agent with JAMF Now.
Step 2 – Assign users to the system – Click on the new system that you created and then Click on the Users tab then tick on each user that you want to have an account on the Mac. Within 60 seconds the users will be created on the Mac
Step 3 – You are done!
When adding JumpCloud agent to an existing Mac, if the JumpCloud Account name matches the Apple Mac Account name the user ids will immediately sync. If you were a local admin on the Mac and are not configured as an Admin for the system on JumpCloud then you will lose admin rights.
If you are following a standard user naming convention in JumpCloud and the existing Mac’s Account name does not match that convention you have a few choices then a new account will be created and the existing Mac account will not be synced with JumpCloud.
The simplest method to force the syncing is to create the user in JumpCloud with the same user name as the Mac Account Name. Although this will mean not having a standard user naming convention in JumpCloud it is safe.
To view local Mac Account Name Click on System Preferences, then Users & Groups, Unlock the Panel and enter the admin password. Then, hold down CTRL and click the user name you want to lookup. Click on Advanced Options to view the local Mac Account Name. This is the value you should use as the User Name in JumpCloud Users
Create a new user on the Mac and leave the existing local mac user unmanaged. This means starting to use a new login id and migrating files from the old user to the new user.
Another, more dangerous option is to research how to rename a Mac Account name. This is beyond the scope of this article and you should make sure of two things
1 – There is a second Admin user on the system and you know the password
2 – You have a good backup. The Mac Keychain does not like being migrated and the FileVault II has some dependencies that lots of users have run into online.
Warning! – Do not change the Mac Account Name in Advanced options, although you can, it will mess up your ability to login and you will be Googling for how to recover Admin rights and booting into Single User Mode (COMMAND S).
The User names in JumpCloud and Mac support dots and underscores. So you can add several variations of a name.
When I add users to a system in JumpCloud I also add a generic System Admin user that is a Global System Admin so that no matter what happens every Mac will have a System Admin account active.
In the 1990’s and early 2000’s when a new company started out and bandwidth was precious, most businesses implemented an on premise directory server with either Novell or Microsoft Active Directory (AD). The Small Business edition of Active Directory was a cost effective option to start out. Active Directory worked well for on premise Windows PCs but did not help much with road warriors. A single on premise AD server was a big single point of failure, adding high availability and remote replication to an AD server is a non-trivial task that added cost and complexity to an early stage company.
Over the years, as Mac workstations and laptops became more popular in the enterprise especially small software development companies, AD was not a good solution for managing OSX based devices. There has not been an outstanding solution for managing Macs. Apple made small inroads to managing Macs with OSX Server and Open Directory, but that initiative never really gained traction. Google introduced the Munki/Simian based toolset in 2013 to manage Macs at scale.
Today’s healthcare companies must have the ability to deploy and monitor the security and configuration of their Mac Workstations, as well as Windows and Linux based workstations and computers. It is no longer an option to deploy unmanaged Mac OSX devices and hope that believing “Macs don’t get viruses” is sufficient to pass a customer security review.
In April 2014, JumpCloud introduced their Directory as a Service (DaaS) tools. The JumpCloud DaaS product is a cloud based directory that supports Windows, Linux and Mac workstations and Servers. JumpCloud DaaS works well with Software as a Service (SaaS) vendors by supporting LDAP authentication as well as SAML SSO. Many SaaS vendors now have advanced user provisioning APIs (eg Google G-Suite) that allow users to be provisioned in G-Suite via the JumpCloud portal.
For users, having one login to access all of their SaaS tools and a single multi factor authentication option, the experience of on boarding and accessing SaaS tools is simplified. There is one set of password complexity rules for JumpCloud instead of different complexity rules for multiple SaaS applications. If the organization wants to enable multi-factor authentication (MFA), just turn it on in JumpCloud and all SaaS will have MFA enabled.
For IT, managing user add/change/deletes and access rights is simplified by having a directory in the cloud. Also having tools to deploy scripts to Windows, Linux and Mac devices from a single portal is an incredible efficiency booster. JumpCloud also supports the deployment of SSH public keys providing an elegant tool set to manage SSH public keys on servers, solving a real world problem of deploying SSH keys for development and DevOps teams. Now it is easy to disable SSH password logins and use only SSH public/private key pairs. A user’s public key will be pushed to any system that you enable for the user in the JumpCloud portal. No more need to write scripts that use ssh-copy-id.
For DevOps, not having to allocate technical resources to manage Active Directory and Federation services is an order of magnitude simplification of the task of managing directory servers as well as cost.
JumpCloud is easy to setup, by creating a free 10 day account here. JumpCloud is free for up to 10 users forever, perfect for DevOps teams to practice with their own small domains. If you have more than 10 users, the trial is free for 10 days. Until this month, there was a $100/month minimum so the 11th user was expensive. However, JumpCloud eliminated this minimum charge as of August 23, 2018.
Anyone who has managed Macs at any scale without a directory server knows the pain of user management. The JumpCloud system and the JumpCloud agent makes user Mac user management simple and almost magical. Just this month the JumpCloud agent for Mac gained the Menu Bar option to better manage Mac local passwords with JumpCloud. Click the Menu Bar option on your mac and you can quickly update the local Mac Password and the JumpCloud Password.
How does the Jumpcloud agent sync users between JumpCloud and the Mac local users? It is amazingly simple, the account name field in the Mac’s local Users Advanced Options setting must match the account name in the JumpCloud directory. Adding a user to a system is as simple as ticking a check box next to the user’s name on the system in the JumpCloud portal and within 60 seconds the user will be created on the local Mac.
JumpCloud also uses a service account on the Mac to be able to manage the FileVault II whole drive encryption. Note: It is a good practice to add a System Admin account to every mac so that there is a common system administrator user on all macs.
JumpCloud supports the following user management features.
Directory Sync with Office 365 and Google G-Suite. When you create a new user in JumpCloud tick on the G-Suite or Office 365 options for the user, the user will be automatically provisioned in G-Suite or Office 365.
Generalized LDAP authentication when a device like a NAS needs to have LDAP authentication. The users are not synced, the LDAP authentication happens at runtime/login time.
SAML Single Sign On Authentication for SaaS providers for web based authentication. There are two types of SAML SSO. For AWS IAM authentication, the configuration supports just in time provisioning. This means that the user does NOT need to be manually created in AWS IAM first. The other SAML SSO is a manual provisioning (eg box.com) where the user is manually created in Box but the SAML SSO is used for authentication when the user wants to login to box.com
The JumpCloud agent allows users to be managed on local workstations and servers by way of the agent that syncs the user credentials. One elegant aspect of the JumpCloud agent is that the credentials are pushed locally to the devices/servers. If you are an admin on 100 AWS EC2 instances, when you change your password, the updated password will be automatically pushed to all 100 instances. There is no need for EC2 instances to have LDAP authentication configured for runtime authentication.
JumpCloud also supports Radius as a Service so that the small offices can authenticate their user access to a directory rather than the typical post it notes and whiteboards used for sharing WIFI WPA keys. With JumpCloud any size office can have directory based WIFI access controls.
Last year I was busy implementing policies and procedures to achieve HITRUST CSF certification. At the same time nation state hacking tools and vulnerabilities were being released on a monthly basis. I felt like I was caught in an IT security riptide. The goal of security and compliance seemed to be getting further away no matter how fast we tried to swim towards compliance. Then I happened on to the book by Alfred Lansing Endurance: Shackleton’s Incredible Voyage.
Endurance is the true story of explorer Sir Ernest Shackleton’s voyage to Antarctica in 1914 in the ship named Endurance. Shackleton’s ocean voyage ended one day from their goal, when the Endurance became trapped in the ice. The ordeal then began, surviving in the Antarctic with no radio and no hope of rescue. All 28 of the crew survived from January 2015 to final rescue in August 2016. Imagine, surviving 19 months in Antarctica in 1915 with only the equipment available at that time.
I was inspired by this incredible story. Certainly, if Ernest Shackleton and his crew could survive 19 months in Antarctica in 1915, we can survive the onslaught of threats to our infrastructure and achieve security and compliance in 2018.
Many of the 12 rules that Shackleton followed before and during the adventure are what kept the men alive and moral as high as possible. These rules also apply to IT/DevOps teams in these challenging times for achieving security and compliance in the face of ubiquitous, sophisticated, nation state sponsored hacking tools. Rule number 12 is especially relevant to this IT/DevOps
Shackleton’s Way of Selecting and Organizing a Crew:
Start with a solid crew of workers you know from past jobs or who come recommended by trusted colleagues.
Your Number Two is your most important hire. Pick one who compliments your management style, shows loyalty without being a yes-man, and has a talent for working with others.
Hire those who share your vision. Someone who clashes with your personality or the corporate culture will hinder your work.
Fire quickly when it is clear you made a wrong recruiting decision even if it means legal action.
Weed out potential slackers or people who are not prepared to do mundane or unpopular jobs.
Be a creative, unconventional interviewer if you seek creative, unconventional people. Go deeper than job experience and expertise. Ask questions that reveal a candidates personality, values, and perspective on work and life.
Don’t stick doggedly to your list of questions; rely on your intuition as well.
Surround yourself with cheerful, optimistic people. They will reward you with the loyalty and camaraderie vital for success. Also, they will stick by you when times get tough.
Applicants hungriest for the job are apt to work hardest to keep it.
Hire those with the talents and expertise you lack. Don’t feel threatened by them. They will help you stay on the cutting edge and bring distinction to your organization.
Spell out clearly to new employees the exact duties and requirements of their jobs, and how they will be compensated. Many failed work relationships start with a lack of communication.
To help your staff do top-notch work, give them the best equipment you can afford. Working with outdated, unreliable tools creates an unnecessary burden.
This coming series of articles will focus on companies that are just starting to deploy infrastructure. It is important to understand the new tools available today that allow new companies to start out with a solid foundation for supporting security and compliance. Existing companies wanting to remediate an existing infrastructure or mature companies that did not deploy managed infrastructure can also apply these tools but their tasks are complicated by change management and replacing/integrating existing infrastructure.
All companies today need to address security and compliance to be in a position to prove that their customer’s data is safe. Customers are rightfully getting concerned about the security of where their data is being stored and accessed. The requirements for security and the need to prove security will only increase over time. It is far easier to start off with a modern secure foundation than it is to pause in later stage growth to implement security and compliance.
Traditionally companies have started with an on premise directory service like Microsoft Active Directory and then built up from there. Active Directory is complicated to make accessible to road warriors and a distributed workforce. Many times, new enterprises start using SaaS vendors like G-Suite, Box,com, Amazon Web Services without a centralized directory service. Deploying SaaS services without a centralized directory server will inevitably become chaotic as the number of employees and the number of SaaS applications grow. User’s do not enjoy having different credentials for all of their SaaS application.
These articles will focus on how to deploy centralized “Directory as a Service (DaaS)” in the cloud using JumpCloud. JumpCloud eliminates the need, complexity and cost for an on premise directory server and provides better management of users and systems by providing cloud based LDAP, SAML Single Sign On, Radius as a Service. SSH Key Management and User Management for Apple Macs, Windows PCs and Linux systems (physical and cloud based)
Companies recognizing that a major weakness of SaaS applications is users have too many logins and credentials. The various SaaS systems are harder to audit for access rights. Cloud based directory as a service providers are rapidly adding new features monthly. Cloud based SaaS vendors are improving their LDAP and SSO integration capabilities every month also. This makes it a good time to be looking at cloud based directory services.
For example, JumpCloud can auto-provision users in G-Suite. Auto-provisioning means that users are created/modified/deleted in G-Suite by using the JumpCloud portal. JumpCloud uses the G-Suite APIs to sync the users between JumpCloud and G-Suite. JumpCloud also provides on-demand provisioning for AWS IAM users so that users do not need to be manually provisioned in IAM. JumpCloud provides SAML Single Signon for SaaS vendors like Box.com where you would need to manually create the users in the SaaS vendor’s portal, but their login credentials are managed through JumpCloud Single Sign On. JumpCloud also provides “Radius as a Service” for office WiFi authentication from a directory instead of the typical small office practice of static WPA keys handed out on post-it notes.
When the HIPAA regulations were initially enacted in the early 2000’s, there was much fanfare and misunderstanding on how to implement the new regulations. Some practices thought is was as simple getting rid of clear patient folders and having patients sign new consent forms. Looking back now at the initial Privacy, Security and Transaction rules, they were a painful first step on a long journey to better patient information security.
Today, we have regulations with real consequences for breaches and poor security practices. The Health Information Technology for Economic and Clinical Health Act (HITECH) act in 2009 introduced stiffer penalties for breaches, consequences for business associates and meaningful use to encourage information sharing. As a result, Security and Compliance surveys and audits by providers and payors proliferated and consumed a tremendous amount of labor and time. There had not been a standard method to assess the security of business associates until the last few years when the HITRUST Alliance seems to have gained traction with large HIT enterprises.
The HITRUST Alliance has a framework for security called the Common Security Framework (CSF). The current CSF edition is version 9.1 dates February 2018. Companies will need to sign up for and license the framework to get started. It is easy to register and download a 668 page PDF. The framework contains lots of cross references to governance controls like HIPAA, NIST, HHS Cybersecurity Program, FedRAMP etc. Organizations of different sizes have increasingly stringent requirements as the size increases.
The CSF PDF is not very helpful when it comes to defining HOW to implement the Policies and Procedures. Many large organizations are now using the CSF to perform risk management on their IT vendor. The CSF is an improvement because now one certification can meet the verification requirements of multiple customers. Some large organizations have built their own vendor certification portals based on the CSF.
As far as I know there is little in the way of tools to assist a company to implement tools to manage the CSF compliance process. It is currently very labor intensive. The terms and conditions of the HITRUST alliance CSF prohibit specifically the groups below.
IT security service providers,
IT security product providers,
IT security consultants, and/or
IT security vendors and suppliers.
I am not sure why, but this prohibition seems to prevent tool builders from entering the CSF market to help enterprises manage compliance. There is a new article (Sept 10 2018) on the HITRUST website about TrendMicro and HITRUST alliance forming a new company to provide Cyber Risk Management as a Service.
If you are starting from scratch, you can checkout a very helpful GIT repository that Catalyze.IO/Datica made available to the industry at https://github.com/catalyzeio/policies. These policies are a good start but you will still be adding your own, editing these and implementing controls for your environments. These policies are a good model to start from and you may learn a lot about how another company implemented CSF policies and passed CSF Assessments..
The Datica policies use the Markdown lightweight markup language and Git to manage the actual policies. Markdown is a powerful plain text language that links across documents like HTML but is easy to edit, and using GIT repository allows everyone to see what has changed. Markdown does not like images or screen shots, so I prefer using Confluence a Wiki editor with labels to manage the Policies and Procedures and documenting the implementation evidence. Confluence also supports document workflows to help manage the state of the documents, draft, approved, reviewed etc.
The CSF version 9.1 is composed of 13 control sections.
00.0 – Information Security Management Program
01.0 – Access Control
02.0 – Human Resources Security
03.0 – Risk Management
04.0 – Security Policy
05.0 – Organization of Information Security
06.0 – Compliance
07.0 – Asset Management
08.0 – Physical and Environmental Security
09.0 – Communications and Operations Management
10.0 – Information Systems Acquisition, Development, and Maintenance
11.0 – Information Security Incident Management
12.0 – Business Continuity Management
13.0 – Privacy Practices
Within each section are numerous control references. For each control reference there are five attributes Policy, Procedure, Implementation, Managed and Monitored. An organization must design its Policies and Procedures around the CSF controls and then cross reference them to the CSF controls The CSF certification process involves contracting with an outside ‘assessor’ to review the policies and procedures and ensure that there is evidence that the Policy exists, the Procedure is in place and there is evidence that the procedure is being followed. The assessment is not a one time event, it will need to be performed on a recurring basis. The hardest assessment will be the first for most organizations. Once the organization passes the third party assessment then will be able to claim they are CSF Certified and advertise this on web pages and marketing materials.


 Adding a system to JumpCloud is very simple.
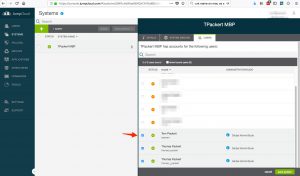 Step 2 – Assign users to the system – Click on the new system that you created and then Click on the Users tab then tick on each user that you want to have an account on the Mac. Within 60 seconds the users will be created on the Mac
 When adding JumpCloud agent to an existing Mac, if the JumpCloud Account name matches the Apple Mac Account name the user ids will immediately sync. If you were a local admin on the Mac and are not configured as an Admin for the system on JumpCloud then you will lose admin rights.
 The User names in JumpCloud and Mac support dots and underscores. So you can add several variations of a name.
 In the 1990’s and early 2000’s when a new company started out and bandwidth was precious, most businesses implemented an on premise directory server with either Novell or Microsoft Active Directory (AD). The Small Business edition of Active Directory was a cost effective option to start out. Active Directory worked well for on premise Windows PCs but did not help much with road warriors. A single on premise AD server was a big single point of failure, adding high availability and remote replication to an AD server is a non-trivial task that added cost and complexity to an early stage company.
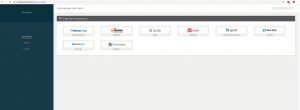 For users, having one login to access all of their SaaS tools and a single multi factor authentication option, the experience of on boarding and accessing SaaS tools is simplified. There is one set of password complexity rules for JumpCloud instead of different complexity rules for multiple SaaS applications. If the organization wants to enable multi-factor authentication (MFA), just turn it on in JumpCloud and all SaaS will have MFA enabled.
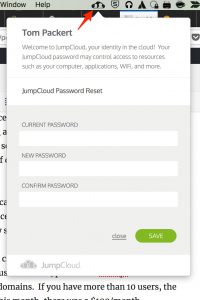 Anyone who has managed Macs at any scale without a directory server knows the pain of user management. The JumpCloud system and the JumpCloud agent makes user Mac user management simple and almost magical. Just this month the JumpCloud agent for Mac gained the Menu Bar option to better manage Mac local passwords with JumpCloud. Click the Menu Bar option on your mac and you can quickly update the local Mac Password and the JumpCloud Password.
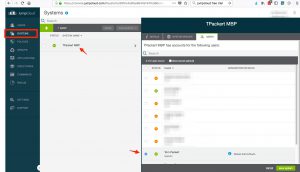 How does the Jumpcloud agent sync users between JumpCloud and the Mac local users? It is amazingly simple, the account name field in the Mac’s local Users Advanced Options setting must match the account name in the JumpCloud directory. Adding a user to a system is as simple as ticking a check box next to the user’s name on the system in the JumpCloud portal and within 60 seconds the user will be created on the local Mac.
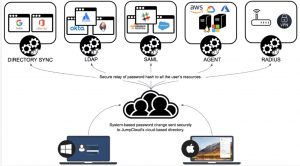 JumpCloud supports the following user management features.
 Last year I was busy implementing policies and procedures to achieve HITRUST CSF certification. At the same time nation state hacking tools and vulnerabilities were being released on a monthly basis. I felt like I was caught in an IT security riptide. The goal of security and compliance seemed to be getting further away no matter how fast we tried to swim towards compliance. Then I happened on to the book by Alfred Lansing
  When the HIPAA regulations were initially enacted in the early 2000’s, there was much fanfare and misunderstanding on how to implement the new regulations. Some practices thought is was as simple getting rid of clear patient folders and having patients sign new consent forms. Looking back now at the initial Privacy, Security and Transaction rules, they were a painful first step on a long journey to better patient information security.